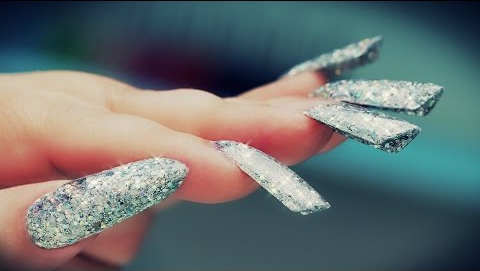
Amazing Edge Glitter Acrylic Nails - Step by Step Tutorial Trendy
Edge Glitter Acrylic Nails. hi it's easy from New York education and i found a new color i'm in love with it's called silver cocktail I'm going to do an edge nail something really different let's get started so the edge nail is one of those kind of newer nail shape so they're kind of futuristic in my opinion and what makes it so neat is that it's so different than a conventional mail it doesn't have that nice arch and very natural looking shape this one kind of defies natural we're just going to go crazy and futuristic with this one we're really focusing on a v-up into the front looks like a ridge like a spine you might think it's quick different so in order to get that Ridge want to take a regular form you can even do a stiletto form we're going to them long but we don't need to still little form and then you can see on this forum has a line down the center so I'm gonna take it and I'm going to literally bend it keep it on the paper though if you peel it off and bend it will stick to itself then you're gonna have to throw a shirt again so take the center line and just crease it can get pretty strong crease.
I don't know if you have to do the side one so much but I'm going to do it and try to decide if it's necessary or not but I've seen this done I'm kind of used to it I've done too many of these I've done a few but not a ton but i like them and i think i'll be doing more so once you get your creases decided then you're going to peel it off and you're going to split the paper and now you're ready to form this is so important this step because it really the shape is all in your form you don't get this right you can't fix it so I've already prepped these nails I took off my French glitter that was stuff that was like you should have seen as like a French glitter crime scene here just a minute ago but i got them all off and I'm ready to go and I've dehydrated and.
Edge Glitter Acrylic Nails - Step by Step Tutorial
I've primed it now when you're doing this cocktail glitters what I'm doing it's much like that French glitter I did but its silver cocktail is the same company same line magnetic when you put that on if you put it directly on a nail bed if the client comes back in a month or so and she wants the color changed filing all that silver right down to the National bed can be somewhat painful for the client and really frustrating for yourself if you want to get that last little glitter off there so i highly recommend putting a thin layer of acrylic down on the nail plate first and that's what I've done with these ones and i'm just going to show you ok so when you are forming is so crucial in your placement usually when I'm forming I like it to go with a nice arch giving a nice natural conventional looking at this one is a bit different you have to form the edge where it's actually straighter and in some cases you can go up a little bit because you really want to get that spine that high back . the ridge and performs are always to go under and if anybody has a question if you could do this with tips I don't think so not unless the tip is already pre manufactured in that edge shape for you so when I'm pinching these together on the end I'm going to pinch these together looking there you want that v-shape so it's pretty straight across it looks like I'm gonna have a bit of an arch and I'm just trying to decide if i want to do that god it's pretty straight still ok that's super important to get that form straight ok and i am going to put a little bit of acrylic down first you can put clear pink whatever you want because you're going to put the silver cocktail on top but you do have to cap the silver cocktail because it's a glitter right most glitters you have to clear cap so you can have to save room for that too so we don't want to be super-thick cuticle so laying down a very thin layer here then your silver cocktail then you're clear on top right and near the cuticle of course we want it nice and thin ok so these tips that i'm giving you sure we're just diving right into the acrylic but there's a lot of preparation that I've done on the natural nail that if you don't know how to do those things you really need to look into it but i would advise you take a course you haven't taken a course i recommend just doing this on a fake hand don't do it on anybody or yourself okay i'm going to put a nice thin layer just a small bead of a curler on the natural nail plate before.
I lay down the color and this is try to make it as thin as you possibly can that's a nice thin layer just to protect that you may not make sense to you now but come the day she come back to you or he and they want to be able to change that color you don't want to cause them any pain trying to take it off and be miserable for both you and I wanted to do one of these as an accent nail I can't decide maybe i'll do it as the long run this one here is an accent nail meaning i want to do it a bit different have a bit of a different design is over cocktail stuff is gorgeous when I first saw it I just like wow magnetic you've really outdone yourself I mean it doesn't look like much until you get the monomer on it it looks amazing let's show you so i think i'm going to try to do this one of French yeah by travelpod member trying one side first because you can see on that paper is going to fall down the side I'm just gonna lay it work have gravity work with me here the idea of a hedge I think it looks kind of best long so I'm going to make this one rather long but it is a very very flat on the side email and they have to lay the product in their first and do my friend shaft it's so weird such a weird now ok so now i'm gonna sit and play in the French I want to get any sparkles on the nails I'm just going to perfect that French up yeah just building up to the edge if you want these fairly long i'm gonna go far out I'm just going to build up the sides and make sure there's enough product therefore when i'm finally it is long maybe that's too not let's have a little fun.
I can only short that you can make sure i'm building that Ridge is still to do my clear cap on top we can't file glitters direct most closers and the edge it has an angle this way just cut off this way too much come straight out here straight out on the side there and then the ends are angled like that you can do it in style here now or you can do in the filing will do in both the right to the end so I'm just going to make sure I've got all my products everywhere that I want it's a little dip on this side it's gonna fill it in here ok so when I look down I got to make sure that it's like that like a teepee i guess and then making sure that my sides it's coming straight out so if I took my file it's literally straight straight out on the size it looks and that's looking pretty good ok so i'm just going to clear cap that that's a giant clear captain bead you don't have to do the cuticle so much this particular design because it's French right and I'm just making sure my clear cap is covering the arch right down to the sides Press that all the way to the end as far as this B will take me mucho mas fotos out of snow funny little lines and then I'm going to continue clear captain right to the end I don't see much of a rigid but I see that I'm gonna have to really file that Ridge in there if you've never seen an edge you're probably wondering what I'm talking about and once you see me do one you'll understand what I'm talking about how pronounced it is which creates the whole edge shape I'm gonna warm up the other nails they're not going to be French I won't do them French okay that's good
Jika Anda menyukai Artikel di blog ini, Silahkan
klik disini untuk berlangganan gratis via email, Anda akan mendapat kiriman artikel setiap ada artikel yang terbit di Nail Design Ideas


.jpg "Trendy 2016 Nail Designs Latest")


.jpg "Trendy TOP Nail Designs 2016 Latest")


0 comments:
Post a Comment